Documentation
Everything you need to know to write your novel with Composez — starting with the skills that do the heavy lifting.
Skills
Skills are the heart of Composez. Each one is a focused, expert workflow that Claude runs against your manuscript — a developmental editor, a line editor, a beta reader, a continuity checker, and so on. You don’t have to write the prompt; the skill knows what it’s doing.
Under the hood, a skill is a SKILL.md file in .claude/skills/<name>/ that tells Claude exactly how to do one job well: what files to read first, how to scope its work, what format to output, and how to commit. Composez ships eleven default skills covering the full lifecycle of a novel, and you can drop in your own.
The Skills Panel
Open the Skills panel from the bottom tab bar. You’ll see a card for each available skill, grouped roughly by stage — planning, drafting, editing, reviewing, publishing.
For each skill you can:
- Set scope — some skills accept an act, chapter, or scene scope (e.g. “act 2 chapter 3”). Leave it blank to run on the full manuscript.
- Set arguments — a few skills take additional input (e.g.
voiceaccepts a sample-text path;character-voice-auditaccepts a character name). - Launch — click the Launch button. Composez records a
SkillRun, opens Claude Code on the same repository, and hands it the slash command (e.g./blueprint run-3).
While Claude works, the run shows up in the panel as pending. As soon as Claude pushes its claude/* branch, Composez links the run, and your existing merge strategy (auto-merge or prompt-to-merge — see Sync) kicks in.
How skill runs are tracked
Composez injects a unique run-N token into the launch prompt. The skill’s SKILL.md instructs Claude to prefix every commit it makes during the run with <skill>, run-N:. That’s how Composez links a run back to the branch Claude produces — no special API calls, just commit-message conventions.
You can see all runs and their statuses in the Skills panel:
- Pending — launched, waiting for Claude to push a branch
- Linked — branch found and waiting to merge
- Merged — branch has been merged into your main
- Failed — Claude couldn’t complete the work; check the branch for partial output
Skill Reference
Below is each default skill, what it does, and when to reach for it. All skills read your db/core/ files (style guide and metadata) on every run, so they always work in your voice.
Plan
/ideate
Guided brainstorming for a new novel. Claude leads a conversational session about premise, characters, setting, conflict, and themes — asking questions, offering possibilities, and letting you make the calls. Every decision is saved as a structured entry in db/ so the other skills can build on it.
Use it when you have a spark of an idea but no shape yet, or when you want to flesh out an existing concept before you commit to structure.
/blueprint
Turn a story concept into a chapter-by-chapter outline. Claude reads whatever you have in db/ (premise, characters, themes), proposes a narrative structure, and writes out the full novel/Act N/Chapter N/Scene N/SUMMARY.md tree.
Use it after /ideate, or any time you have the conceptual material but want a structural editor’s eye on the shape of the book.
/voice [sample text path]
Define the prose style. Claude either guides you through style decisions from scratch, or analyzes a sample of your existing writing (pass a file path as the argument) to extract its voice characteristics. Output is db/core/style.md, which every other skill respects.
Use it before drafting a new novel, or when you want to formalize the voice of a manuscript already in progress.
Draft
/drafter [scope]
Write first-draft prose from summaries. Claude reads your style guide and the full outline, then drafts PROSE.md files chapter by chapter using parallel sub-agents to keep pace. Every scene gets full prose — no placeholders, no “the scene continues.”
Pass a scope to limit it (/drafter act 1, /drafter 2 3 for act 2 chapter 3) or leave it blank to draft the whole book.
Edit
/line-editor [scope]
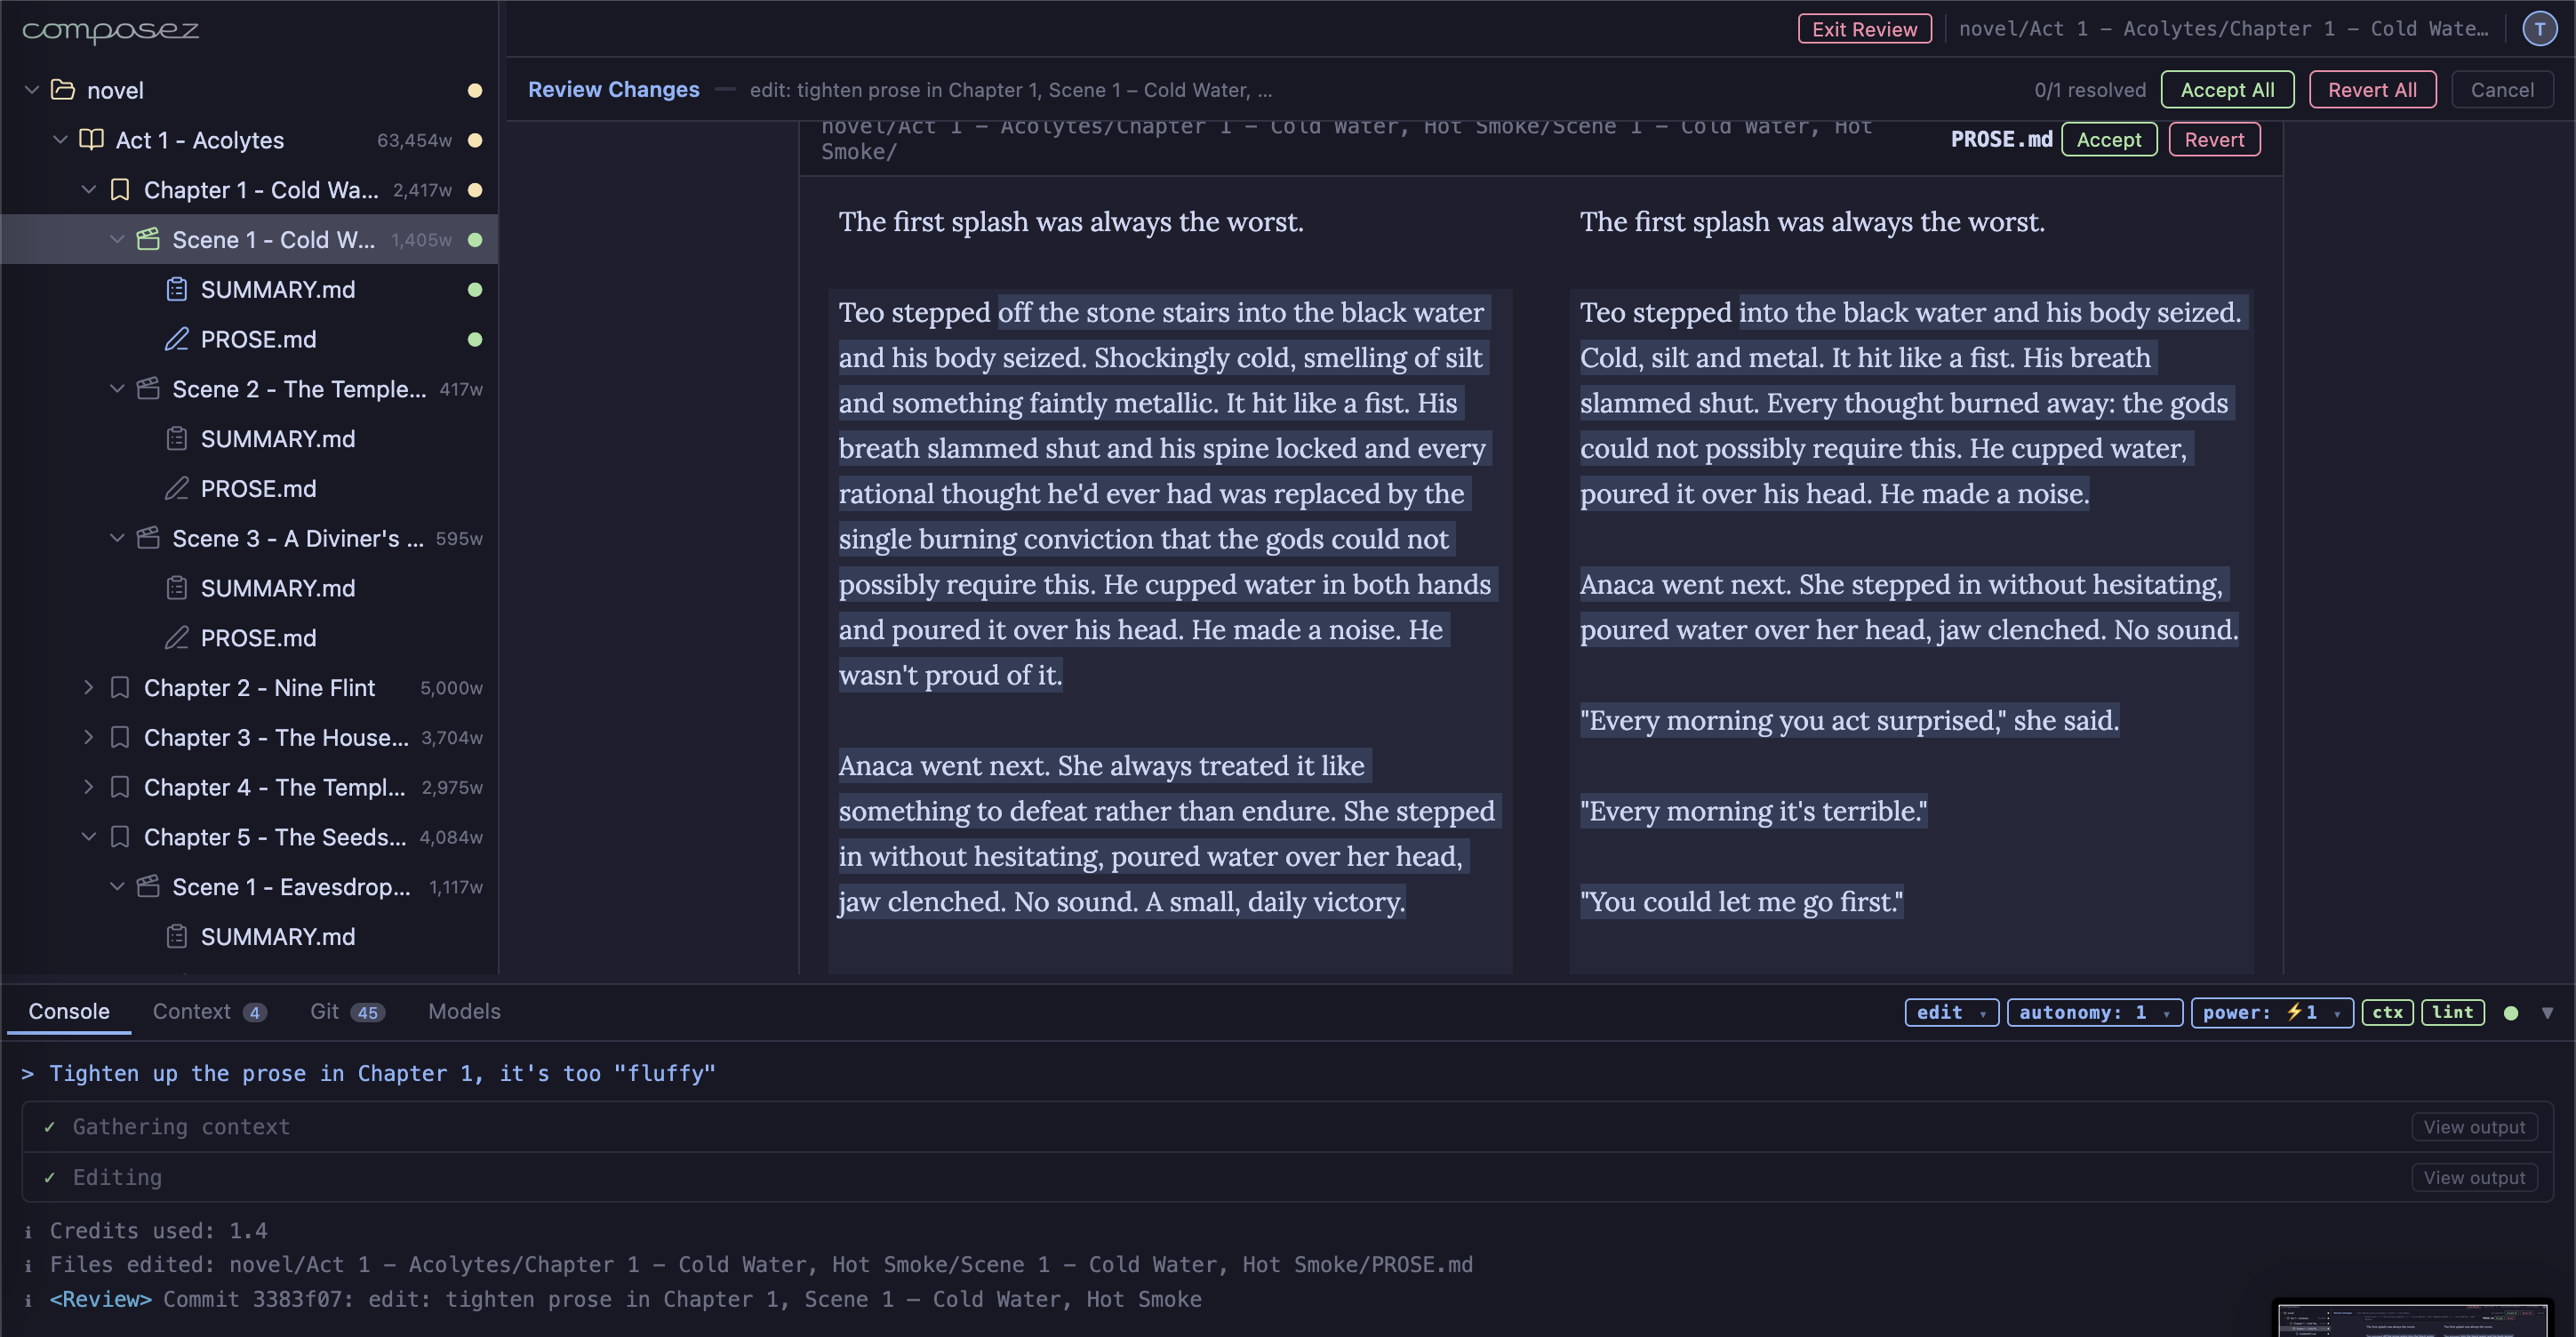
Scene-by-scene prose polish. Tightens flabby sentences, cuts filter words (“she felt”, “he saw”), fixes rhythm problems, and replaces clichés — preserving your voice. Every change is presented as a before/after diff for approval before being applied.
This is line editing, not rewriting. If you want structural change, use /beta-reader first.
/humanizer [scope]
Detect and fix AI-generated prose tells. Combines three methods: Vale’s ai-tells linter for known overused vocabulary, n-gram repetition analysis to catch formulaic patterns, and contextual review for the rest. Outputs a frequency-ranked report with a chapter heat map, then offers fixes.
Use it after /drafter or any time you suspect the prose sounds too machine-y.
Review
/beta-reader [scope]
A full beta reading pass. Claude reads the manuscript carefully and evaluates it the way a thoughtful human reader would — emotionally, narratively, and at the sentence level. Covers structure, character, dialogue, prose, emotional resonance, and theme. Produces a structured report with prioritized revision suggestions.
This is the highest-effort skill. Reach for it when you’d otherwise be paying a beta reader.
/continuity-checker [scope]
Systematic continuity check. Catches timeline errors, character detail contradictions (eye colour, age, accent), dropped plot threads, and inconsistencies with your db/ reference material. Cross-references the manuscript against the codex.
Run it after big revisions, before sending to a beta reader, or any time you’ve been making changes for a while and want a sanity pass.
/character-voice-audit [character name or scope]
Dialogue consistency check. Reads every line of dialogue with the speaker tags stripped and asks: would I know who said this? Flags where characters sound interchangeable.
Pass a character name to focus the audit on one voice, or a scope to limit it to a section of the book.
Publish
/cover
Design a front cover. Claude doesn’t generate the image itself — it drafts a single, detailed prompt you can paste into ChatGPT, the OpenAI API, or any DALL·E-compatible interface, including title and author name as rendered text. Then it walks you through generating, reviewing, and uploading the final image to db/cover/front.jpg.
Once your cover and back-cover image are in place, use Export to produce a publish-ready EPUB or a print-ready wraparound cover PDF (front + spine + back as a single spread, sized for your trim and page count) ready for KDP, IngramSpark, or any other print-on-demand service.
/website-developer
Build a promotional book website. Generates plain HTML/CSS/JS pages under website/ — tailored to your book’s tone, using the title, author, premise, cover image, and selected excerpts. Publish via Git → Publish Website (GitHub Pages) or download as a zip.
Custom skills
Composez treats .claude/skills/ as user-editable. Drop in your own skill folder with a SKILL.md and it appears in the Skills panel alongside the defaults.
A minimal SKILL.md looks like:
---
description: One-line description shown on the skill card.
disable-model-invocation: true
allowed-tools: Read Bash Agent Glob Grep
argument-hint: "[scope or other args]"
effort: medium
---

# My Skill

Use when the user asks for X. Detailed instructions for Claude follow...
The description field is what shows up on the panel card. argument-hint tells the UI what shape of argument to suggest. Everything below the frontmatter is the prompt Claude reads when the skill runs.
To make commit-message linking work for a custom skill, instruct Claude to prefix every commit with <skill-name>, run-N: (where run-N is the leading argument token). Otherwise your run will still link via the fallback branch-snapshot diff, but only if your run produces exactly one new claude/* branch.
Custom prompts (no skill required)
If you just want to fire off a one-off Claude Code task that doesn’t deserve its own skill, use the Custom run option in the Skills panel. Type a freeform instruction, and Composez launches it as a claude/* branch with the same merge tracking as a skill run.
Start Your Novel
To get started in Composez, you can first create a new project, or import your existing manuscript.
Create a new project
Click + New Novel to create a blank project. Composez sets up the full directory structure automatically, including the novel/ directory for your manuscript and the db/ directory for your reference database.
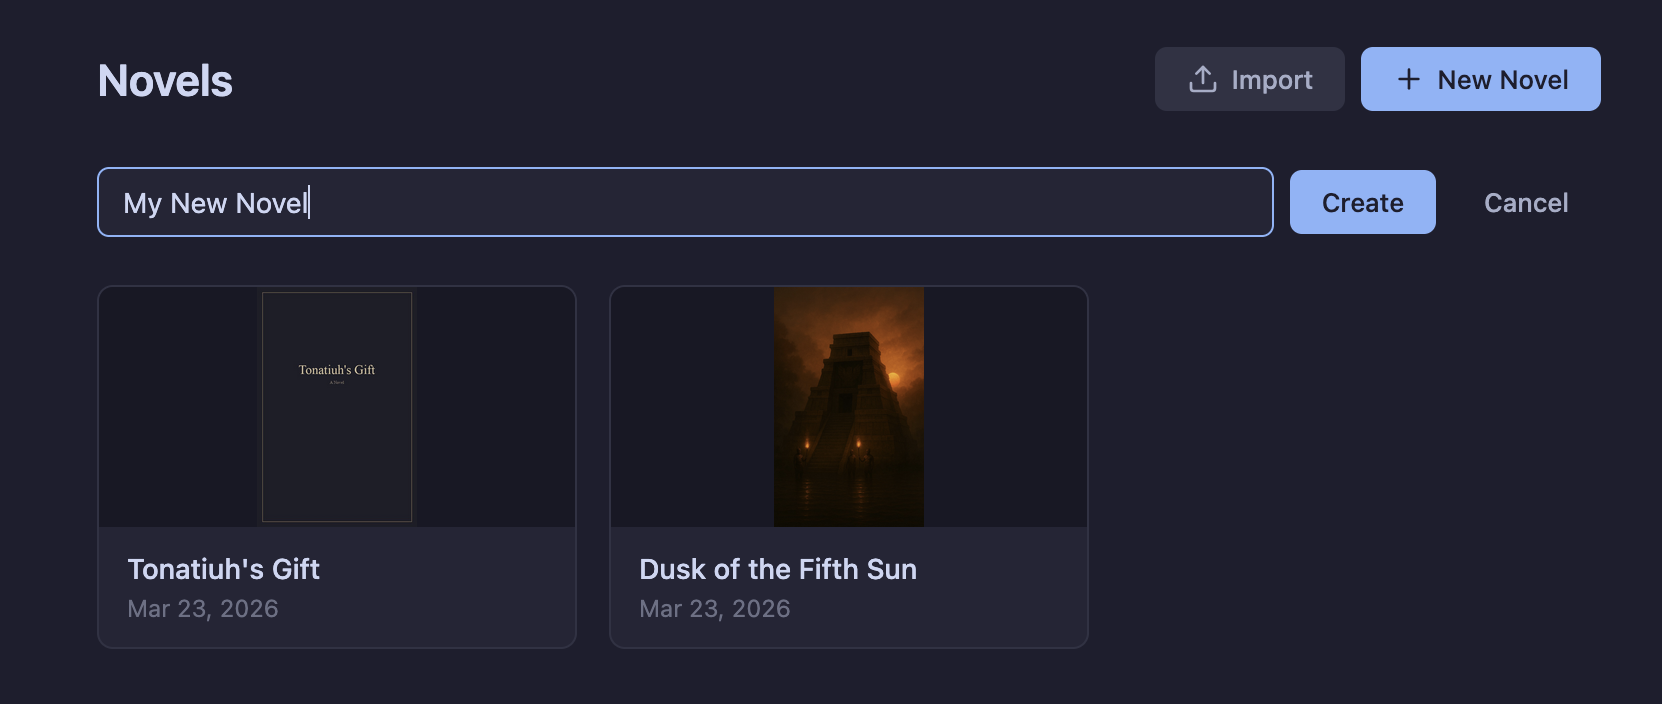
Importing an existing manuscript
To import a manuscript, click Import from the home page. A dialog lets you choose from three formats:
- Markdown — Upload a single
.mdfile. The importer splits your document on headings: H1 becomes an act, H2 a chapter, and H3 a scene. - Word — Upload a
.docxfile. The importer splits on heading styles: Heading 1 becomes an act, Heading 2 a chapter, and Heading 3 a scene. Bold and italic formatting is preserved. - Novelcrafter — Upload a zip file from Novelcrafter’s Markdown export.
Please be sure to follow the on-screen formatting instructions.
Basic Editing
Novel Structure
By default, your manuscript is organized into acts, chapters, and scenes. Each scene folder contains two files that form the backbone of your novel: SUMMARY.md, a summary of that particular scene; and PROSE.md, containing your full novel text for the scene.
novel/
  Act 1 - Title/
    Chapter 1 - Title/
      Scene 1 - Title/
        SUMMARY.md      # scene synopsis
        PROSE.md         # the actual narrative text
Right-click on any act, chapter, or scene in the file tree to access structural commands:
- New chapter… / New scene… — Create new child elements
- Insert scene before / Insert scene after — Add siblings with automatic renumbering
- Delete — Remove an element (with confirmation)
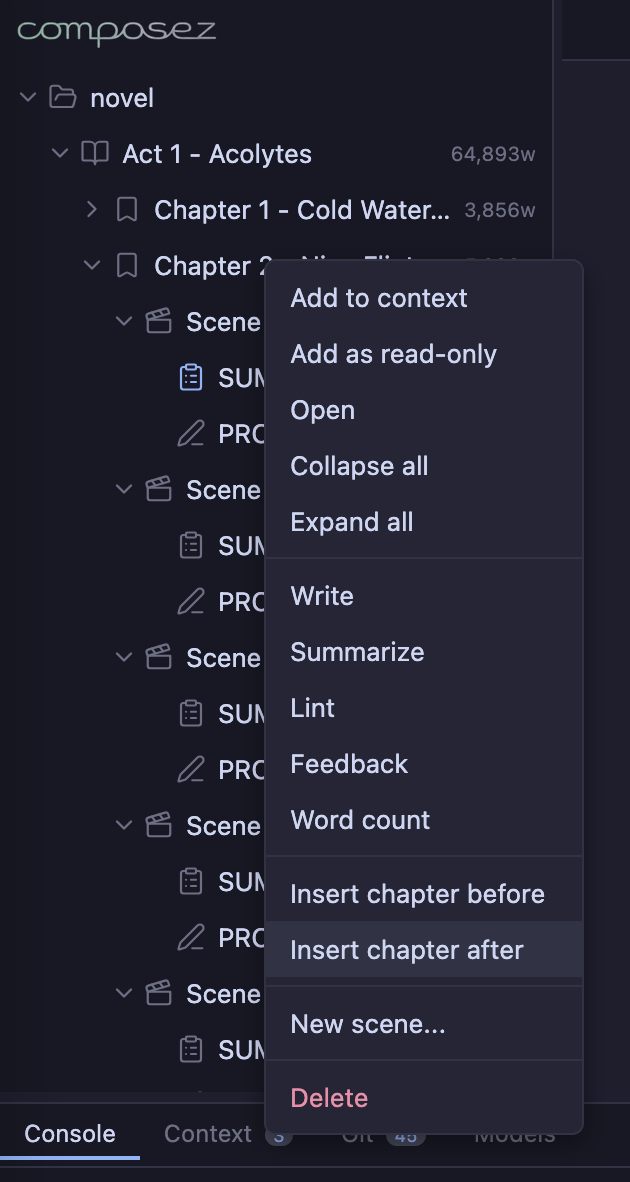
You can also drag and drop scenes within the tree to reorder them (though many authors find it easier to use the Grid view in your outline for major restructuring). Files and act/chapter-scene directories will be automatically renamed to fit the new ordering.
Click any act, chapter or scene in the file tree to open it and start editing. The editor displays the summary and prose together, and a formatting toolbar appears at the top.
Composez provides three editing modes, each suited to different writing tasks. Switch between them using the mode dropdown in the bottom-right status bar.
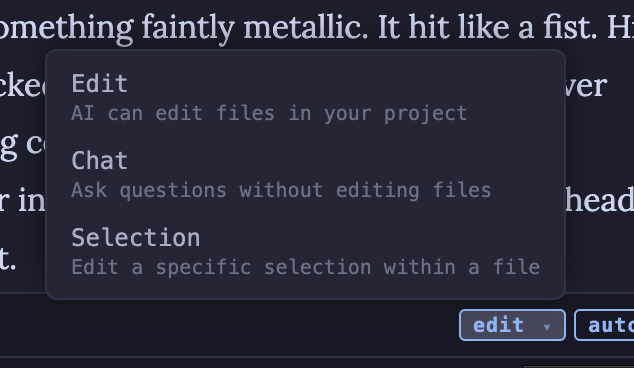
Edit mode
Edit is the default mode. Type a message in the console and the AI makes changes directly to your files. This is best for drafting new content, revising passages, or making structural changes.
Simply describe what you want changed:
> Make the opening of act 1, chapter 3 more atmospheric
>
> Add dialogue between Elena and Teo in the same chapter.
>
> Write chapter 4 based on the summary.
The AI reads the files in your context and applies the edits.
Chat mode
Chat mode lets you ask questions about your manuscript without making any changes. Use it to brainstorm ideas, get feedback on plot points, or check character consistency.
> Who has the strongest motivation to betray the group?
>
> Does the timeline in chapter 3 make sense?
The AI has access to the same context as edit mode, but will only respond with text — no files are modified.
Selection mode
Selection mode targets a specific range of text within a file. Select text directly in the editor, then right-click to choose an instruction from the context menu. Two built-in instructions are provided:
- Collapse — Condense the selected passage
- Expand — Elaborate on the selected passage
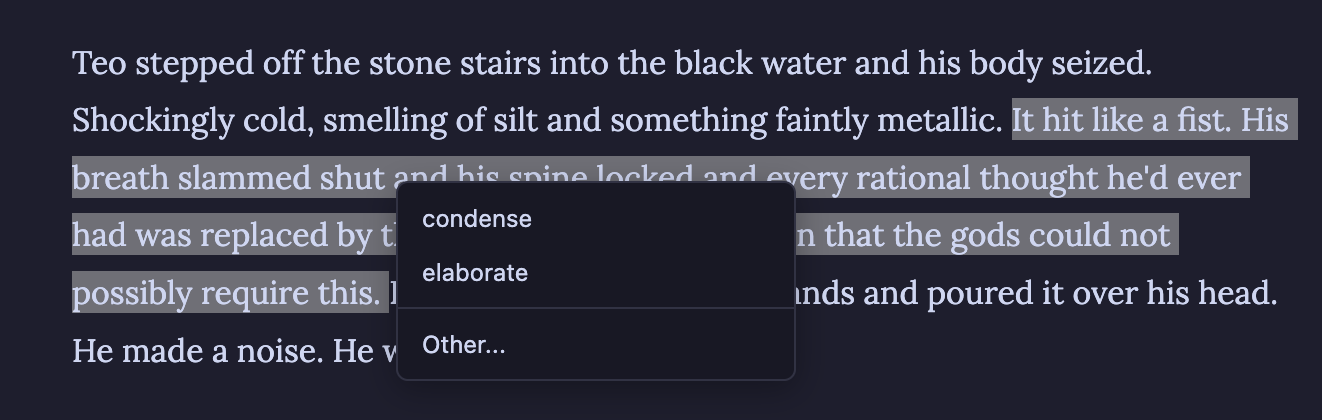
You can also click the Edit in chat button that appears when text is selected to give the AI freeform instructions about what to change in the selected passage.
Custom instructions
You can easily build a personal library of reusable editing operations. To add your own custom edit instructions, right-click on instructions/ in your file tree and click New instruction…. Name your new edit command and write your instructions in the editor.
Instructions work for both selection and edit mode. For working with selections of text, each file becomes an option in the selection right-click menu. For broader edits, you can right-click on the instruction and choose Send to chat….
One-liners
You can always fire off a quick command in another mode without switching. Type the mode name as a slash command with your prompt:
/edit rewrite the opening paragraph— runs a one-shot edit/query what year is this scene set in?— asks a question/select ...— makes a targeted selection edit
Reviewing AI changes
After any AI edit, click the
- Accept — Keep the new version
- Revert — Restore the original
- Accept All / Revert All — Batch-process all changes
- Edit the new version directly in the diff view before accepting
When you’re satisfied, enter an optional commit message and click Commit to finalize.
If you want to reject all of the changes, you can run /undo in the chat window to rollback one set of changes at a time. The Review menu in the top navigation bar also lets you compare and review back in time to any previous state.
The Editor
The editor uses markdown format to edit and store text. If you’re not familiar with markdown syntax, don’t worry, you can just write plain text and a formatting toolbar appears at the top of the content pane to help you with styles:
- B, I — Bold and italic
- H1, H2, H3 — Heading levels
- List and Numbered list — Bullet and ordered lists
- Quote — Block quotes
- Rule — Horizontal divider
- Source — Toggle between the rich editor and a raw code view
The View menu lets you control how summaries and prose are displayed when viewing a directory:
- Summaries: Expanded, Collapsed, or Hidden
- Prose: Full or Hidden
Working with Summaries
Summaries are a core part of the Composez workflow. Every scene has a SUMMARY.md file alongside its PROSE.md. Summaries serve as concise synopses that help the AI (and you) keep track of what happens in each scene without reading the full prose — keeping context efficient and your story consistent.
Generating summaries
Right-click on a scene, chapter, or act in the file tree and select Summarize to have the AI generate scene summaries from existing prose. You can also right-click on a PROSE.md file directly and choose Write summary.
Writing prose from summaries
The reverse workflow is equally powerful. Right-click on a scene and select Write. The AI reads the scene’s summary, nearby summaries for surrounding context, and your style guide to produce prose that fits naturally into your manuscript.
You can likewise right-click on a whole chapter and select Write to write all scenes in that chapter.
Alternatively, in edit mode, you can also use plain text to ask your AI assistant to write whichever chapters and scenes you want it to work on.
Higher-level summaries
The novel workflow is built around scene summaries. However, if you need higher-level outlines that span multiple chapters or acts, the db/notes/ directory is a great place to store them. Create files like overall-outline.md or act-2-arc.md to capture big-picture story structure. The AI assistant can read and work with these files just like any other reference material — add them to context and ask the AI to update them as your story evolves.
Outline & Grid Views
The outline pseudo-folder in the file tree gives you a bird’s-eye view of your entire manuscript’s summaries. It mirrors your novel’s act and chapter structure but shows only summaries, with word counts displayed next to each entry.
Colored dots next to outline entries indicate context status: a green dot means the summary is included in the AI’s context. Double-click any outline node to toggle its summaries in or out of context.
Click on an act or chapter within the outline to see all its scene summaries displayed as a grid of cards — making it easy to spot gaps in your story, review pacing, and check continuity at a glance.

Context Management
Context is what the AI “sees” when it responds to your requests. Managing context well is the key to getting high-quality, consistent output.
Auto-context
The ctx toggle in the bottom-right status bar controls auto-context. When enabled, the AI automatically identifies which files are relevant before each edit — pulling in nearby scene summaries, character sheets, and other reference material.
Auto-context works well for general editing, but you’ll often want finer-grained control over exactly what the AI reads and edits.
Manual context: double-click to add or remove
Double-click any file or directory in the file tree to toggle it in or out of the context. Files in context show a colored dot indicator in the tree (green if all files in the subtree are selected; yellow if only some are).
For right-click options, choose Add to context (editable) or Add as read-only to control whether the AI can modify the file.
You can also use the /add and /drop commands in the chat window to add whole acts, chapters, scenes or other folders. These commands understand directories and files, as well as special shortcuts for the act/chapter/scene structure. For example, /add 2 will add all of Act 2. The command /add 2 1 3 will add Act 2, Chapter 1, Scene 3.
The outline folder and summary context
The outline/ folder is a pseudo-directory useful for context management of summaries. Double-click any node in the outline tree to add or remove all summaries under that act, chapter, or scene. This lets you quickly give the AI broad awareness of your story’s structure without loading every prose file.
The Context tab
Click the Context tab at the bottom of the screen to see exactly what’s in the AI’s context window. The Context tab shows:
- Name — The file or summary group
- Type — Whether each entry is editable, read-only, system, or examples
- Words — Word count for each entry, with a total at the top

From this tab you can:
- Click the lock icon to toggle a file between editable and read-only
- Click the X to remove a file from context
- Click column headers to sort by name, type, or word count
- Use the refresh button to update word counts
The total word count, which you can sort by, helps you keep tabs on credit usage and stay within model context limits.
Novel Database
The db/ directory is your novel’s reference database: a structured collection of character sheets, location descriptions, world-building notes, and more. The AI reads these files to maintain consistency across your manuscript.
Just like the files in your novel/ directory, both you and your AI assistant can not only read the db/ folder and files, but also edit and update them as you work on your novel. Simply add them to your context in either edit mode to make changes, or read-only mode to ensure they’re just used for context.
Database categories
db/
  core/              # always loaded
    metadata.yml     # title, author
    style.md         # prose style guide and conventions
  characters/        # character sheets
  locations/         # setting descriptions
  items/             # important objects
  themes/            # thematic elements
  notes/             # author notes, outlines, arc summaries
  style/             # additional style guides
  other/             # miscellaneous reference
  cover/
    front.jpg        # front cover image
    back.jpg         # back cover image
These are just the defaults, you can always add your own sections.
Core files: Metadata & Prose Style
The db/core directory is special in that the files here are always included as read-only context in every AI interaction. It starts out with two key files:
metadata.yml— Contains your novel’s title, author name and other key detailsstyle.md— Your prose style guide. This is where you define voice, tone, POV conventions, and any stylistic rules the AI should follow.
These files shape every AI response, so it’s worth investing time in getting them right. To assist you in creating your style.md, see the /analyze-style command in the Command Reference to analyze your existing prose and automatically extract a style description.
Cover images
The db/cover/ directory holds your novel’s cover art. front.jpg and back.jpg are recognized as special files and displayed in the project interface.
Creating and managing entries
To create a new database entry, right-click on any category folder (e.g., characters/, locations/) and select New [category] entry…. Type a name and press Enter to create the file, then fill in the details.
Database entries are pulled into context automatically when auto-context is enabled, or you can add them manually by double-clicking in the file tree (see Context Management). The AI can also create and edit database entries — include the relevant db/ directory in your context and ask the AI to add or update entries.
LLM Models
Composez lets you control the AI model power level to balance quality and cost.
Power levels
Click the power dropdown in the bottom-right status bar to switch between tiers:

| Level | Description | Best for |
|---|---|---|
| Low Power | Fastest, lowest cost | Quick drafts, simple edits, brainstorming |
| High Power | Balance of quality and cost | Major writing and revision tasks |
| Frontier | Maximum quality, very high credit usage | Complex rewrites, nuanced character work |
| Custom | Your own API keys and models | Full control over model selection |
Custom models
Click the Models tab at the bottom of the screen to access advanced model configuration. From there you can:
- Enable custom API keys — Use your own OpenAI-compatible or Anthropic API keys
- Select models per role — Choose different models for query, edit, selection, compose planning, and agent orchestration
- Track usage — View your credit spend, budget, and reset schedule
Prose Linting
Composez includes a built-in prose linter powered by Vale that checks your writing for style issues, passive voice, cliches, AI-tells, and other prose quality concerns.
Auto-lint
The lint toggle in the bottom-right status bar enables automatic linting after every AI edit. When enabled, the AI will refine its output until it passes the configured lint rules — catching issues before you even see them.
Running the linter
Right-click on any scene, chapter, act, or prose file in the file tree and select Lint to manually run the linter on that content. After linting, Composez reports issues and offers to fix them using the AI.
Customizing lint rules
Lint rules are configured in the .vale.ini file at the root of your project. Vale uses packages like write-good, proselint, and ai-tells that are tuned for fiction writing. You can customize which rules are active, add your own, or adjust severity levels. We support all of the built-in Vale linters. If there’s another one you would like included, please contact support.
For more on configuring Vale, see the Vale documentation.
Git Version Control
Every Composez project is backed by Git, a powerful version control system used by almost every programmer. Every AI edit is automatically committed, giving you a complete history of changes and the ability to roll back anything.
How it works
When the AI makes changes to your files, Composez automatically creates a git commit with a descriptive message. You never lose work — every version of every scene is preserved in the history.
Reviewing and rolling back
Click the Review dropdown in the top bar to browse recent commits and see exactly what changed. The review pane shows a side-by-side diff where you can accept or revert individual files (see Reviewing changes above).
To completely undo the most recent AI edit, type /undo in the console.
The Git tab
Click the Git tab at the bottom of the screen to access full version control:
The Git tab has four sub-sections:
- Changes — View staged and unstaged file changes, stage or discard individual files, and commit with a message
- Graph — A visual commit history showing branches and merges
- Stashes — Save and restore work-in-progress snapshots
- Sync — Remote repository integration
You can also use the /git command in the console, which supports most standard git actions. For more on Git, see git-scm.com.
Sync
Sync your project to a GitHub repository via the Sync sub-tab in the Git panel. Click Connect GitHub to link your account, then select a repository.
Once connected, the Auto Sync section lets you enable:
- Auto-merge from GitHub main — Automatically pull and merge changes from your remote main branch
- Auto-push Composez main — Automatically push your local commits to the remote
The Claude Integration section provides two options for handling branches created by Claude Code (see below):
- Auto-merge Claude branches — Automatically merge Claude’s work as soon as it’s detected
- Prompt to merge Claude branches — Get a notification in the console when Claude completes work, with options to Merge, Skip (defer until later), or Delete the branch
Only one of these can be active at a time.
Pairing with Claude Code
Claude Code is the engine that runs every skill — and you can also drive it directly. Every Composez project includes a CLAUDE.md file with detailed instructions about your novel’s structure and conventions, so Claude Code understands the layout out of the box.
Skills launched from the Skills panel are the recommended way to use Claude Code with Composez (see Skills above). But you can also open Claude Code yourself and give it freeform instructions — useful for one-off tasks that don’t fit any existing skill.
Setting it up
Setting up the Claude Code integration involves a few steps:
- Connect to GitHub via the Git Sync tab
- Choose a merge strategy in the Claude Integration section:
- Auto-merge to incorporate Claude’s work immediately, or
- Prompt to merge to review each branch before merging
- Open Claude Code on the same repository — either by clicking Launch on a skill, or by opening it manually for a freeform task
When Claude Code finishes, it pushes a branch (named claude/...) to your GitHub repository. Composez detects this branch on the next sync check (every 30 seconds) and either merges it automatically or prompts you in the console.
Freeform Claude Code tasks
Beyond the skill library, here are some things Claude Code excels at when pointed at a Composez project:
- “Reorganize Act 3 so that the reveal happens two chapters earlier” — Claude plans the restructuring, executes
git mvcommands, renumbers scenes, and smooths transitions - “Update all character sheets in db/characters/ to reflect what happens in Act 2” — Claude reads the relevant prose and updates the reference database
- “Find every scene where Elena and Teo are alone together and tighten the romantic tension” — targeted, multi-scene work the built-in skills don’t directly cover
For tasks like these, use the Custom run option in the Skills panel (which gives you the same branch tracking as a skill run), or open Claude Code separately. After each task, review the changes using the <Review> link, accept or revert individual files, and commit the result.
Agentic Mode
Composez offers three autonomy levels that control how much independence the AI has when working on your manuscript. Switch between them using the autonomy dropdown in the bottom-right status bar.
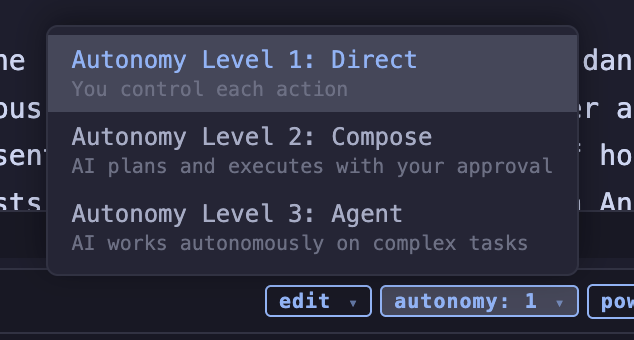
Level 1: Direct
The default mode. You send a prompt, the AI responds with one edit or answer. You control every action.
Level 2: Compose
A two-phase workflow. First, a planning model designs the changes and presents them for your approval. You can review the plan, refine it with feedback, or reject it before a second model implements the edits. This is ideal for complex, multi-part revisions where you want oversight before execution.
When the AI presents a plan, you’ll see buttons to Proceed, Stop, or Refine (provide feedback to adjust the plan).
Level 3: Agent
Full autonomous mode for multi-step actions. The AI generates a step-by-step plan and then executes each step in sequence, monitoring its own progress. A progress display shows each step’s status as the agent works. Agent mode is best for large-scale tasks like drafting an entire act, reorganizing your narrative structure, or running feedback-and-revision cycles across multiple scenes.
You can pause and resume the agent at any time using the controls in the console.
Note: Automatic plan generation is still experimental. For reliable, repeatable automation, use Agentic Templates (see below) or the Claude Code integration.
Agent Templates
Agentic Templates give you full control over multi-step automation. A template is a YAML file in the agent-templates/ directory that defines a sequence of named steps, each containing one or more slash commands.
To run a template, right-click on it in the file tree and select Run agent template.
Here’s an example template (quick-draft-example.yml) that scaffolds an entire novel from a plot summary:
template:
  - "Add characters":
    - "/add db/other/overall-plot-summary.md"
    - "/edit Based on the plot summary, come up with three
       interesting characters. Describe them in new
       db/characters/ files"
  - "Add settings":
    - "/read-only db/other/overall-plot-summary.md"
    - "/edit Where does this novel take place? Add key
       locations in db/locations/"
  - "Plan overarching story":
    - "/query Brainstorm what should happen in act 1,
       act 2, and act 3. > db/notes/overall-outline.md"
  - "Prepare scene summaries for {1-3, 1-10}":
    - "/add db/notes/overall-outline.md"
    - "/add summaries"
    - "/edit Plan scene summaries for act {act},
       chapter {chapter}. Create 3-5 scenes."
  - "Write each {*, *}":
    - "/add {chapter-1}"
    - "/drop {chapter-2}"
    - "/write {act} {chapter}"
Template Walkthrough
Each top-level item under template: is a named step. The agent executes them in order, running each sub-command sequentially within a step.
Step 1 — “Add characters”: Loads the plot summary into context, then asks the AI to create character entries in db/characters/. This populates your reference database before any prose is written.
Step 2 — “Add settings”: Adds the plot summary as read-only (so the AI can reference but not modify it), then generates location entries in db/locations/.
Step 3 — “Plan overarching story”: Uses chat mode (/query) to brainstorm the three-act structure. The > redirect saves the AI’s response directly to db/notes/overall-outline.md, creating a persistent outline for later steps.
Step 4 — “Prepare scene summaries for {1-3, 1-10}”: This is where loop variables come in. The {1-3, 1-10} range in the step name tells the agent to repeat this step for acts 1 through 3 and chapters 1 through 10 within each act. On each iteration, {act} and {chapter} are replaced with the current indices. The step loads the outline and existing summaries, then asks the AI to plan 3–5 scene summaries for each chapter.
Step 5 — “Write each {*, *}”: The wildcard {*} iterates over all acts and all chapters that actually exist (created in step 4). For each chapter, it adds the previous chapter’s context ({chapter-1}) for continuity, drops the chapter before that ({chapter-2}) to keep context manageable, and then generates prose from the summaries.
Template variables
Variable loop setup is done from a step name, where you specify an act, chapter, scene trio ({*, *, *} to loop through every scene in the novel), an act, chapter duo ({*, *} to loop through every chapter in the novel), or an act ({*} to loop through every act in the novel).
At this top level of loop setup, the following can be used for each element:
| Variable | Meaning |
|---|---|
* |
Wildcard — iterate all at that level |
1-3 |
Range — iterate 1 through 3 |
1 |
Exact number |
Then, with the loop setup, each step has the following variables available for any command:
| Variable | Meaning |
|---|---|
{act}, {chapter}, {scene} |
Current loop index |
{act-1}, {chapter-1} |
Relative reference (previous) |
Templates let you build sophisticated writing pipelines — from initial brainstorming through drafting and revision — that run with a single click.
REST API
Composez exposes a REST API that lets you trigger template execution from external tools or custom scripts. You can run any agent template or a raw sequence of slash commands against a project, poll for status, and get notified when the work is done.
Every API job runs on its own isolated branch, so it never interferes with what you’re doing in the editor. When the job finishes, the branch is pushed to GitHub (if connected) and you receive a notification in the UI with a one-click merge command.
Authentication
The API uses Bearer token authentication. To create and manage tokens, click your avatar in the top-right corner and select API Keys.
Include your token in every request:
curl -H "Authorization: Bearer YOUR_TOKEN" \
     https://composez.ai/api/projects/PROJECT_ID/run \
     -X POST -H "Content-Type: application/json" \
     -d '{"template_name": "quick-draft-example"}'
Starting a Job
POST /api/projects/<project_id>/runSubmit a saved template by name, or provide inline commands:
{
  "template_name": "quick-draft-example",
  "input_policy": "auto_confirm",
  "input_branch": "main"
}
{
"template": "/write 1 2 3\n/feedback 1 2 3\n/lint",
"input_policy": "auto_confirm",
"input_branch": "main"
}| Field | Default | Description |
|---|---|---|
template_name |
Name of a template in agent-templates/ (without .yml). Mutually exclusive with template. |
|
template |
Raw newline-separated slash commands. Mutually exclusive with template_name. |
|
input_policy |
auto_confirm |
auto_confirm automatically accepts plan confirmations. pause halts the job and waits for your response via the respond endpoint. |
input_branch |
main |
Which branch to base the work on. |
The response includes the job ID and the branch name where work will happen:
{ "job_id": "a1b2c3d4e5f6", "branch": "composez-run/a1b2c3d4e5f6" }Polling Status
GET /api/projects/<project_id>/run/<job_id>| Status | Meaning |
|---|---|
running |
Commands are still executing. |
paused_for_input |
Waiting for a response (only when input_policy is pause). |
completed |
All commands finished. The branch is ready to merge. |
failed |
Something went wrong. Check the error field. |
Responding to a Paused Job
POST /api/projects/<project_id>/run/<job_id>/respond{ "action": "proceed" }This resumes a job that was paused for input. Only needed when input_policy is pause.
Merging Results
When a job completes, any open browser tabs receive a notification with a merge command. Click it to run:
/merge composez-run/a1b2c3d4e5f6This merges the job’s branch into your current branch. If there are conflicts, Composez uses AI-powered conflict resolution to merge them cleanly.
Exporting
Right-click on the novel folder in the file tree and select Export… to save your manuscript. A dialog lets you choose from three formats:
- Markdown — A single
.mdfile containing your full novel - Word (DOCX) — A formatted Word document ready for editors or submission
- EPUB — A packaged ebook file for e-readers

Command Reference
While most actions are available from the UI via right-click menus and toolbar controls, Composez also provides a full set of console commands for power users. Type any command in the console input at the bottom of the screen.
Writing Commands
| Command | Description |
|---|---|
/write [location] |
Generate prose from scene summaries |
/summarize [location] |
Generate summaries from prose |
/feedback [location] |
Get structured critique of your prose |
/lint [location] |
Run the Vale prose linter |
/lint-level [level] |
Set lint severity: error, warning, or suggestion |
/auto-lint [on\|off] |
Toggle automatic linting after edits |
Editing & Mode Commands
| Command | Description |
|---|---|
/edit [prompt] |
Switch to edit mode, or run a one-shot edit |
/query [prompt] |
Switch to chat mode, or ask a one-shot question |
/ask [prompt] |
Alias for /query |
/select <range> |
Set a text selection for selection mode |
/compose |
Switch to compose mode (plan then edit) |
/agent [prompt] |
Switch to agent mode, or run a one-shot agent task |
/apply-agent-template <name> |
Run an agentic template |
Context Commands
| Command | Description |
|---|---|
/add <target> |
Add files to context (1 2 3, db characters, summaries 1, or a file path) |
/drop <target> |
Remove files from context |
/auto-context [on\|off] |
Toggle automatic context identification |
/instruct [name] |
Load an instruction file from instructions/ |
/analyze-style [location] |
Add prose as read-only for style analysis |
/copy-context [continue] |
Copy the chat context transcript to clipboard |
/paste-response |
Apply an LLM response from the clipboard |
Structure Commands
| Command | Description |
|---|---|
/new <type> [location] [title] |
Create a new act, chapter, scene, or db entry |
/delete <type> [location] |
Delete a node, prose, summary, or db entry |
/insert-before <location> [title] |
Insert a node before a position (renumbers siblings) |
/insert-after <location> [title] |
Insert a node after a position (renumbers siblings) |
/move <source> to <dest> |
Move a node to a new position |
Git & Version Control
| Command | Description |
|---|---|
/git <subcommand> [args] |
Run a git command (status, log, diff, branch, etc.) |
/merge <branch> |
Merge a branch with automatic conflict resolution |
/undo |
Roll back the most recent AI edit |
Import & Export
| Command | Description |
|---|---|
/import novelcrafter <path> |
Import from Novelcrafter zip |
/import markdown <file> |
Import from Markdown (splits on headings) |
/import word <file> |
Import from Word document (splits on heading styles) |
/export markdown |
Export to a single Markdown file |
/export docx |
Export to Word document |
/export epub |
Export to EPUB ebook |
Session Management
| Command | Description |
|---|---|
/save chat [name] |
Save chat history to a named slot |
/save ctx [name] |
Save current file context |
/load chat [name] |
Restore chat history |
/load ctx [name] |
Restore file context |
/help [command] |
Show help, or detailed help for a specific command |
Location shorthand
Many commands accept a location argument. You can specify locations in several ways:
/write 1 2 3                  # Act 1, Chapter 2, Scene 3
/write act 1 chapter 2        # same thing, with keywords
/write chapter 3              # Chapter 3 in current act
/write act 2                  # all scenes in Act 2